
How To Read Oil Dipstick With No Markings?
To read an oil dipstick with no markings, remove it, wipe it clean, reinsert it fully, then pull it out again to check the oil level. The oil should coat the lower portion of the dipstick, and a clear line where the oil stops indicates the level. In most cases, the safe oil range is roughly between the bottom 1–2 inches of the dipstick tip. To avoid overfilling or running low, check the owner’s manual or compare with a known correct oil level after an oil change.
“A universal dipstick is only as accurate as your measurement of the original; always use your old dipstick as a ‘master template’ to set the adjustable collar on the new unit to ensure your ‘Full’ mark aligns perfectly with the engine’s sump capacity.”
Table of Contents
Clean the stick, reinsert, pull, read the wet edge, then add temporary marks.
If your dipstick has no lines, you can still get a safe reading. I’ve spent years solving this exact problem in shops and driveways. In this guide, I’ll show you how to read oil dipstick with no markings, set your own marks with care, and avoid mistakes that can harm your engine. You’ll learn quick checks, pro tips, and step-by-step methods that work on most cars.
Why some dipsticks have no markings
Some cars use aftermarket dipsticks that were never marked. Others had the tip worn smooth or the paint washed off. A few models changed tube length over the years, so the stick no longer matches. This can be fixed with a clear process and a little patience.
Reading a dipstick is simple. The tricky part is knowing where safe and full should be. That is why learning how to read oil dipstick with no markings is so useful. When you master it, you protect the engine and your wallet.

Safety and prep before you measure
You need a stable setup to get a true level. A few small steps make a big difference.
Do this first:
- Park on level ground. A slope can throw off the reading.
- Warm the engine, then shut it off for 5 to 10 minutes. This lets oil drain down.
- Use a clean lint-free rag or paper towel. You want a sharp wet line.
- Wear gloves if the engine is hot. Oil can be warm enough to sting.
- Have a light. A flashlight helps you see the wet edge on the stick.
This setup works for most cars and trucks. Always check your owner’s manual for any special steps. It will guide you if your model expects a hot or cold check.
Step-by-step: how to read oil dipstick with no markings right now
You can get a usable reading even without factory lines. Follow the steps below to find the current level and make a temporary reference. This is the fastest way to read how to read oil dipstick with no markings in a pinch.
- Pull and wipe. Remove the dipstick, wipe it clean, and reinsert fully until it seats.
- Pull and read. Remove it again and look for the sharp wet edge. That edge is your current oil level.
- Index the seating point. Mark where the stick meets the tube top with a small piece of tape. This keeps your insertion depth exact for repeat checks.
- Add a temporary reference. Place a thin rubber band or a tiny strip of painter’s tape near the wet edge. Do not use anything bulky that could fall into the tube.
- Recheck once more. Wipe, reinsert, and pull again. The wet edge should land at the same spot. If not, repeat until it is repeatable.
Notes from my bench:
- On some sticks the oil smears. Hold the stick flat and tap it lightly so the wet line sets. That makes the edge sharper.
- If the oil looks foamy, wait longer. Air in the oil can climb the stick and confuse the line.
This gets you a consistent current reading. Next, you’ll learn how to convert that reading into safe marks.
Calibrate and add your own safe marks
To make real low and full marks, you need to link the stick to known oil volume. This part turns a guess into good data. It is the heart of how to read oil dipstick with no markings with confidence.
Method A: the best way after an oil change
- Know the capacity. Check your owner’s manual for total oil capacity with filter.
- Drain and replace filter. Add oil, but stop one quart (or about one liter) shy of the listed capacity.
- Run, rest, and read. Start the engine for 30 seconds, then wait 5 to 10 minutes and read the stick.
- Mark the low line. Scribe a small line at the wet edge. This is your low mark.
- Add the final quart. Repeat the warm-up, rest, and read.
- Mark the full line. Scribe a second line at the new wet edge. That is your full mark.
Method B: calibrate without a full oil change
- Establish a baseline. Do a careful reading as above.
- Add a measured amount. Add 250 ml (about 8 oz) of oil and repeat the read.
- Measure the rise. Note how far the wet edge moved. Repeat as needed to learn how much each small volume moves the line.
- Create marks. Use a scribe or a metal punch to set a low and a full based on your engine’s capacity and the movement per 250 ml.
Pro tips for marking:
- Use a fine triangular file or a center punch. Make shallow, neat marks that you can see.
- If you fear scratching, use high-temp paint pen for a clean line. Reapply as needed.
- Keep marks on the same flat of the stick where you read. That keeps glare down.
Methods to cross-check your reading without factory marks
You can verify your work with simple tools. Cross-checks raise trust in your new marks. This is key to how to read oil dipstick with no markings and be sure about it.
Simple cross-checks:
- Paper towel imprint. Lay the tip on a white towel and roll it once. The wet edge prints sharp.
- Zip-tie depth gauge. Slip a small zip-tie onto the stick. Slide it down to the tube lip when inserted. Pull out and read from the zip-tie to the wet line.
- Thin wire probe. If the stick is hard to read, a clean cable tie or thin wire can show the wet edge with less smear.
- Volume back-check. If you add 500 ml and the line rises halfway between your marks, your scale is consistent.
- Compare with capacity. Your full mark should be near the listed capacity when the oil is fresh and the filter is new.
What I’ve seen in the shop:
- Some dipsticks read a bit high right after shutoff. Waiting the full 10 minutes helped a lot.
- A little patience beats guessing. One more check can save a rebuild.
Troubleshooting odd or unclear readings
Strange readings often reveal other issues. Fix the cause before you mark the stick.
Common problems:
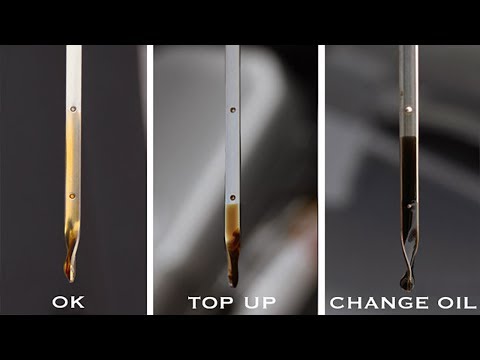
- Milky or tan oil. This can mean coolant in the oil. Do not mark or drive far. Get a test done.
- Fuel smell or very thin oil. Possible fuel dilution. Check for misfire or short trips. Change oil soon.
- Foamy oil. Aeration from overfill or a crankcase vent issue. Let bubbles settle and recheck.
- Oil way above expected. Drain to the correct level. Overfill can whip air into oil and harm bearings.
- Wet line creeps upward over days. Watch for coolant or fuel entry or rare transmission cross-leak in shared systems.
If you fix these first, your marks will be true. This is a big part of how to read oil dipstick with no markings the right way.
Ongoing habits to protect your engine
Great habits make this easy over time. They also extend engine life.
Keep it simple:
- Check every 1,000 miles or once a month. Check more often if the engine is older.
- Use the same process each time. Same parking spot, same warm-up, same wait.
- Log your readings. Note date, miles, and level. Trends tell stories.
- Top up in small steps. Add 100 to 200 ml at a time. Recheck after each add.
- Change oil on time. Fresh oil makes a clear line and protects better.
These habits make how to read oil dipstick with no markings feel natural. Your confidence will grow fast.
Simple tools that make this easy
You do not need fancy gear. A few low-cost items help a lot.
Grab these:
- Small funnel with a long neck. Reduces spills and makes precise top-ups easy.
- Measuring cup or bottle with ml and oz marks. You need measured adds for good marks.
- Shop rag and bright flashlight. A clear wet edge beats a guess.
- Paint pen and a fine file. For clean, durable marks on the stick.
- Nitrile gloves. Oil is messy and can be warm.
I keep these in a box in the trunk. That kit has saved more than one road trip. It is a simple way to master how to read oil dipstick with no markings, even in a parking lot.
Frequently Asked Questions of how to read oil dipstick with no markings
Can I trust a reading without factory marks?
Yes, if you follow a steady method and calibrate with known volume. Repeat the same process each time, and your results will be reliable.
How long should I wait after shutting off the engine?
Wait 5 to 10 minutes so oil drains back to the pan. Some models may need a different wait; check your manual.
Is it safe to scratch marks on the dipstick?
Yes, if you make shallow, clean marks on the flat side of the stick. Avoid deep cuts or burrs that could scrape the tube.
What if my engine uses an electronic oil level system?
Use the built-in check first and follow the manual. Some cars also include a service dipstick port; a shop can read it if needed.
How much oil should I add at a time?
Add small amounts, like 100 to 200 ml, then recheck. Small steps avoid overfill and keep the reading clean.
Do I check oil hot or cold?
Most cars read best warm after a short rest on level ground. Check your owner’s manual for the exact method for your model.
I see metal specks on the dipstick. What now?
Stop driving and get a professional opinion. Metal can mean wear and needs quick attention.
Conclusion
You can get a safe, clear oil reading even with a blank dipstick. Use a steady process, set temporary references, then calibrate with measured oil to create your own low and full marks. With a few tools and a calm approach, how to read oil dipstick with no markings becomes simple and repeatable.
Try the steps on your next check, then mark your stick for good. If this helped, share it with a friend, subscribe for more DIY guides, or drop a question in the comments.