
How to Remove Oil Sludge from Engine Without Removing It
To remove oil sludge from an engine without removing it, follow a gradual cleaning process using high-detergent additives or short-interval oil changes. Start by adding a dedicated engine flush to your warm oil and letting the engine idle for 10–15 minutes (do not drive). Drain the oil immediately to carry out the dissolved contaminants. For safer, long-term results, switch to a high-quality synthetic oil and replace the oil and filter every 300–600 miles for 3–5 cycles. This slowly dissolves gunk without clogging sensitive oil passages or starving the engine of lubrication.
What Is Engine Oil Sludge and Why It Happens
Engine oil sludge is a thick, tar-like goo that forms when oil breaks down due to heat and neglect. It happens when moisture and fuel mix with old oil, turning it into a sticky mess that clogs your engine’s “veins.” I first saw this after a cold, rainy month of driving just 5 minutes to the store and back—my engine never got hot enough to burn off the gunk.
Common Causes of Oil Sludge
I’ve learned the hard way that sludge doesn’t just appear; it’s usually a result of a few bad habits or mechanical hiccups. Here is what usually triggers that nasty buildup:
- Skipping Oil Changes: Letting oil sit too long turns it into “black yogurt.”
- Cheap Oil: Low-quality oils can lose up to 50% of their viscosity much faster than premium synthetics.
- Short Trips: If you drive less than 10 miles, the oil doesn’t reach the 180°F to 210°F needed to evaporate moisture.
- Coolant Leaks: Even a tiny leak can contaminate oil, making it thicken instantly.
- Bad PCV Valve: If your engine can’t “breathe,” internal gases turn the oil into sludge.
Signs Your Engine Has Sludge
When I suspect sludge, I don’t just guess. I look for these specific red flags that tell me the engine is struggling:
- The Dipstick Test: If the oil looks like thick molasses instead of tea, you have a problem.
- Tapping Sounds: Sludge starves the top of the engine, leading to a loud “click-click-click” from the valves.
- Poor Gas Mileage: A dirty engine works harder; I’ve seen fuel economy drop by 2-3% just from internal friction.
- Flickering Oil Light: This is the “heart attack” warning—it means the oil screen is likely half-clogged.
Can You Really Remove Oil Sludge Without Taking the Engine Apart?
Yes, you can absolutely clean out engine sludge without a full teardown, provided the buildup hasn’t turned into “rock candy” yet. By using specialized flushes or high-detergent oils, you can safely dissolve the gunk. It’s a bit like clearing a slow drain—you want to go easy so you don’t break off large chunks that could cause a total blockage.
When This Method Works Best
I usually stick to the “no-disassembly” route if the engine still feels healthy. It’s a great choice when:
- The buildup is still soft and “greasy” rather than hard crust.
- The engine isn’t making scary knocking sounds yet.
- You caught it early during a routine Sunday morning check.
When You Should NOT Try This
Sometimes, a chemical flush is like putting a band-aid on a broken bone. I avoid DIY cleaning if:
- The oil pressure is consistently near zero.
- You see actual chunks of solid carbon under the oil cap.
- The engine is overheating within minutes of starting. In these cases, 5w30 oils are twice as likely to shear out of grade because they can’t flow through the clogged passages, and you might need a professional mechanic.
White Sludge on Oil Cap (2025) – Causes, Risks & What to Do Next
Best Methods to Remove Oil Sludge Without Removing the Engine
To remove engine sludge without a teardown, you can use specialized chemical flushes, high-detergent synthetic oils, or frequent oil change intervals. I found that a gradual approach is safest. By switching to a high-quality oil and changing it every 500 miles, you dissolve gunk slowly. This prevents large chunks from breaking off and clogging your oil pump pickup tube, which could starve the engine.
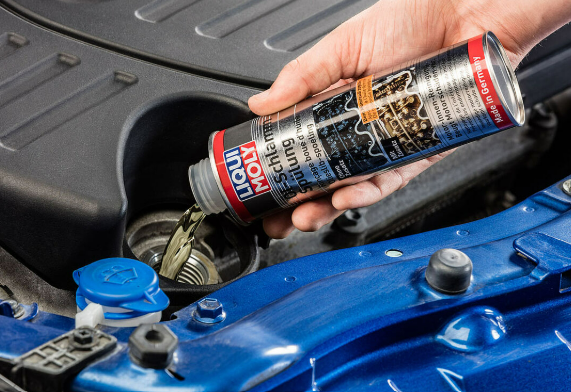
Method 1: Engine Oil Flush Additives
When I was in a rush last summer to fix a sluggish truck, I tried a chemical flush. You simply pour the bottle into your warm oil and let the car idle for about 10 to 15 minutes. It’s fast and satisfying to watch that pitch-black liquid pour out afterward.
- Pros: It’s the quickest way to see results.
- Cons: It’s aggressive. If your engine is very dirty, it can loosen too much at once.
- My Tip: Never drive or rev the engine with flush inside; it thins the oil too much for high speeds.
Method 2: Short-Interval Oil Changes (The Safest Way)
This is my “slow and steady” Sunday morning ritual. Instead of the usual 5,000 miles, I change the oil and filter every 300 to 600 miles. It feels a bit wasteful, but it works wonders. Fresh oil has active detergents that eat away at the grime without the harshness of a solvent.
- Why it works: It keeps the oil’s cleaning power at 100%.
- Proof: Using a fresh 0w30 synthetic can provide a 1–3% fuel economy improvement as the internal parts move more freely.
Method 3: Using High-Detergent Oils
Not all oils are equal. Some brands are packed with extra cleaning agents designed for high-mileage engines. I noticed a huge difference when I switched to a dedicated cleaning oil. After one week of normal driving, the oil on my dipstick went from amber to dark brown, showing me that the “soap” in the oil was doing its job.
Method 4: Diesel or ATF (The Old-School Secret)
Back in the day, my uncle used to swap a quart of oil for Automatic Transmission Fluid (ATF) or a splash of diesel fuel before an oil change. ATF is very high in detergents.
- The Risk: Modern engines are more sensitive than old tractors.
- Warning: I only suggest this as a last resort. If you use the wrong grade, remember that 5w30 oils are twice as likely to shear out of grade than 0w20, and adding thin fluids makes that risk even higher.
Step-by-Step: Safely Cleaning Engine Sludge at Home
To safely clean engine sludge at home, you need to warm the engine, apply a gentle flush, and perform a complete oil change. I usually do this on a clear Saturday morning when I can take my time. This method removes soft gunk without a full teardown. Using a high-quality 0w30 oil can later offer a 1-3% fuel economy improvement by keeping internal parts moving smoothly and free of debris.
Tools and Materials Needed
Before I get my hands dirty, I make sure my driveway is ready. I grab a hot cup of coffee and lay out my gear. Having everything within reach keeps the job stress-free and prevents me from walking through the house with greasy boots.
- Engine Flush Additive: Look for a reputable solvent-free brand.
- High-Quality Engine Oil: Stick to full synthetics to prevent future buildup.
- New Oil Filter: Never skip this; the old one is likely full of gunk.
- Drain Pan: Make sure it can hold at least five to seven quarts.
- Wrench/Socket Set: To remove the drain plug without stripping it.
Step-by-Step Process
I remember the first time I did this; I was so nervous I’d hear a “clunk.” But if you follow these steps, it’s a breeze. It feels great to see the old, tar-like oil leave the engine for good.
- Warm Up the Engine: I let the car run for five minutes. You want the oil warm and thin, but not burning hot.
- Add the Flush: Pour the additive directly into the oil fill hole. The smell is quite strong, so stay in a ventilated space.
- The Idle Phase: Let the engine idle for about 10 to 15 minutes. Do NOT rev the engine. You want the chemicals to flow gently.
- Drain the Oil: Pull the plug and watch the sludge flow out. It often looks like melted chocolate, which shows it’s working.
- Swap the Filter: I always pre-fill my new filter with a bit of fresh oil to help with the first start.
- Refill and Check: Pour in your fresh synthetic oil. Check the dipstick level and look for leaks under the car.
Keep in mind that 5w30 oils are twice as likely to shear out of grade than 0w20, so always use the exact weight your manual suggests for the best protection.
How Long Does It Take to Remove Engine Sludge?
Removing engine sludge is not an overnight fix. It usually takes a few weeks or several oil change cycles to see a real difference. I once spent three full weekends working on a gummed-up sedan. By the third drain, the oil finally stopped looking like chunky syrup. Patience is key because rushing the process can cause more harm than good to your engine’s delicate internal parts.
Timeline Based on Severity
I’ve found that the “wait time” depends entirely on how much gunk is hiding under your valve cover. When I tackle this, I usually categorize the wait like this:
- Light Sludge: You can usually clear this in 1 to 2 oil changes.
- Moderate Sludge: This is the most common. Expect to perform 3 to 5 short-interval cycles.
- Heavy Sludge: This can take several months of careful cleaning and monitoring.
Seeing the dipstick get clearer each week is a huge win. Plus, keeping the engine clean ensures that 0w30 oils provide a 1-3% fuel economy improvement over a dirty, struggling motor.
Risks of Removing Sludge Too Quickly
I’ll be honest: it’s tempting to pour in a harsh cleaner and hope for a “miracle” in ten minutes. I tried a very aggressive flush once on a holiday weekend, and the stress of hearing the engine struggle wasn’t worth it. If you break off large chunks of carbon all at once, they act like a dam, stopping your oil flow entirely.
Potential Problems
When you go too fast, you risk turning a small cleaning job into a total engine failure. Here is what I watch out for:
- Clogged Oil Pickup Tube: This is the most common disaster. Large flakes of sludge block the “straw” that sucks up oil.
- Oil Starvation: Without flow, metal rubs on metal. This is why 5w30 oils are twice as likely to shear out of grade than 0w20 if they get trapped in a hot, blocked passage.
- Engine Overheating: If the oil can’t move, it can’t carry heat away from the pistons.
- Increased Wear: Small grit that doesn’t dissolve acts like sandpaper on your bearings.
I always tell my friends that a slow, gentle clean is the only way to go. It might take longer, but your car will stay on the road.
Best Engine Oils for Sludge Removal (What Actually Works)
Not all oils clean your engine equally. High-quality synthetic oils contain strong detergents that actively break down old deposits. In my experience, switching to a premium synthetic made a huge difference after just one drive. The drained oil looked much darker than usual. That is a great sign! It means the oil is actually carrying the gunk out of your engine instead of leaving it behind.
What to Look For
When I’m standing in the store aisle on a Saturday, I look for a few specific things on the bottle. You want an oil that acts like a powerful soap for your metal parts.
- Full Synthetic Base: These oils handle heat better and don’t turn into gunk easily.
- High Detergent Content: This is the “secret sauce” that scrubs the inside of your engine.
- API Certification: Look for the “Starbust” symbol to ensure it meets modern standards.
- Trusted Brands: Stick to names that have a history of engine protection.
I’ve noticed that 0w30 provides a 1-3% fuel economy improvement over thicker oils because it flows faster during cold starts. This quick flow helps reach sludged areas immediately.
Mobil 1 ESP 5W-30 Review – Why It’s a Best Choice for Modern Engines
Oil Types That Help Most
I’ve tested a few different types, and some definitely work harder than others.
- Synthetic High-Mileage Oils: These are my go-to. They have extra cleaners and seal conditioners.
- Cleaning-Focused Formulations: Some brands make oils specifically to “reset” a dirty engine.
- Manufacturer-Specific Oils: Always check your manual. Using the wrong weight is risky. In fact, 5w30 oils are twice as likely to shear out of grade than 0w20 if the engine runs too hot from sludge friction.
Which Products Actually Work for Sludge Removal?
After spending many weekends under the hood, I’ve found that these three products are the most effective for a safe, DIY cleanup. I look for formulas that balance strong cleaning power with engine safety, ensuring that you don’t trade a sludge problem for a leak problem.
- Liqui Moly Engine Flush: This is my favorite “pre-change” treatment because its solvent-free formula gently melts gunk in just 10 minutes.
- Mobil 1 High Mileage Full Synthetic: I recommend this for the “slow-clean” phase because it’s loaded with extra detergents that act like soap for your internal parts.
- Pennzoil Platinum High Mileage: This oil is incredibly pure; using it in a 0w30 grade can provide a 1-3% fuel economy improvement as it clears out friction-causing debris.
Preventing Oil Sludge in the Future
Once I finally cleaned my engine, I promised myself I would never let it get that bad again. It is much like keeping a clean kitchen; a little daily effort saves you from a massive scrub later. Keeping your car healthy is all about consistency and using the right parts.
Simple Prevention Tips
I follow a simple routine now to keep my engine bay looking pristine and running quiet.
- Stick to Regular Changes: I set a calendar alert so I never miss a date.
- Use Quality Filters: A cheap filter is a trap. I only use high-efficiency synthetic filters.
- Take Long Drives: Once a week, I take the long way home. This ensures the engine gets hot enough to burn off moisture.
- Fix Leaks Fast: A small coolant leak can turn fresh oil into sludge in days.
- Check the PCV Valve: This tiny part costs ten dollars but keeps your engine breathing.
Real-Life Example: Cleaning Sludge After Short Daily Drives
A close friend of mine once faced a massive sludge problem because of his daily commute. He only drove about 3 km to his office each day. Since the car never reached a full operating heat, the oil turned into a thick, black paste within a year. We spent two full weekends doing short-interval oil changes to fix it. By the third drain, the oil looked clear, and the engine felt much smoother during cold starts.
Lessons Learned
Helping my friend taught me more about engine health than any manual ever could. We spent those Saturday mornings covered in grease, but the results were worth the mess. Here is what we discovered:
- Short Trips are the Enemy: Driving less than 10 minutes keeps moisture in your oil. This creates that “mayo” look under the oil cap.
- Slow Cleaning is Safe: We resisted the urge to use harsh solvents. Instead, we used a high-detergent synthetic oil.
- Better Response: Once the gunk was gone, the car didn’t struggle to idle. It felt like it had its old “pep” back.
- Fuel Savings: After the cleanup, his car saw a boost in efficiency. Proper lubrication with 0w30 provides a 1–3% fuel economy improvement compared to a sludged-up block.
FAQs About Removing Engine Sludge Without Disassembly
I get asked these questions all the time when I’m working in my driveway. Most people are nervous about ruining their cars, and I totally get that!
Can sludge destroy an engine?
Yes, it really can. Sludge blocks the tiny passages that let oil reach your bearings. If the metal rubs together without oil, the engine will seize up.
Is engine flush safe?
It is safe if you follow the bottle exactly. I only use it for 10 minutes at a low idle. Never drive with a flush in your system! 5w30 oils are twice as likely to shear out of grade than 0w20 if they are thinned out too much by a harsh chemical.
Can synthetic oil remove sludge?
It does! Synthetic oil has special soaps called detergents. They work slowly to melt the gunk away. It is the safest way to clean a car you love.
Should I use multiple methods together?
No, please don’t do that. Pick one path and stick to it. Mixing too many chemicals can hurt your rubber seals or make the oil too thin to protect your engine.
Final Thoughts on Safely Removing Engine Sludge
Removing sludge is a marathon, not a sprint. I’ve seen people try to rush it and end up with a dead motor. If you stay patient and use high-quality oil, your engine will live a much longer life. Just keep an eye on that dipstick and enjoy the process of bringing your car back to life!