
Removing a head gasket from an engine block means taking off the cylinder head and peeling away the old gasket that sits between the head and the block. Here’s how you do it: disconnect the battery, drain the engine fluids, remove all parts blocking access to the cylinder head (like the intake and exhaust manifolds, timing components, and other attachments), unbolt the cylinder head in the correct order, then carefully lift the head off. Once the head is off, you gently scrape and remove the old gasket from the engine block surface, making sure not to damage the metal. Below, you’ll find a step-by-step guide, essential tips, tools you need, common mistakes, and safety considerations for a complete understanding.
What Is A Head Gasket And Why Remove It?
A head gasket is a thin, strong piece of material placed between the engine block and the cylinder head. Its job is to seal the engine’s combustion chamber, keep coolant and oil separate, and prevent leaks. Over time, the head gasket can fail due to overheating, engine age, or manufacturing defects. When this happens, you may see symptoms like white smoke, loss of coolant, engine misfire, or oil mixing with coolant.
Removing the head gasket is necessary when replacing a failed gasket or during a major engine rebuild. If you ignore a bad gasket, you risk serious engine damage, such as warped heads, cracked blocks, or even a seized engine.
Top 7 best head gaskets – Long-Lasting Seals for High-Performance Engines
Tools And Materials Needed
Before starting, make sure you have the right tools. Using proper tools keeps you safe and prevents damage.
| Tool/Material | Purpose |
|---|---|
| Socket Set & Wrenches | Removing bolts and nuts |
| Torque Wrench | Correctly tightening bolts |
| Screwdrivers (Flat & Phillips) | Removing clamps and covers |
| Pry Bar | Separating cylinder head from block |
| Plastic Scraper/ Gasket Remover Tool | Cleaning gasket surfaces |
| Drain Pan | Catching old coolant and oil |
| Shop Rags | Cleaning spills |
| Replacement Gasket | Installing new gasket |
| Service Manual | Reference for bolt sequences, torque specs |
| Marker or Masking Tape | Labeling parts and wires |
| Gloves & Safety Glasses | Personal protection |
Many beginners forget the importance of a service manual. It provides the correct bolt sequence and torque specs, which are critical for reassembly.
Step-by-step Process: How To Remove Head Gasket From Engine Block
Removing a head gasket is a complex job, but you can do it with patience and care. Here is a detailed process:
1. Prepare The Workspace
Work in a clean, well-lit area. A garage is best, but even outdoors can work if the area is flat and you have enough space. Lay out your tools and label containers for bolts and small parts.
2. Disconnect The Battery
Always start by removing the negative terminal of the battery. This step prevents accidental electrical shorts or shocks while working.
3. Drain Engine Fluids
Place a drain pan under the radiator. Open the radiator drain valve or remove the lower hose to drain the coolant. Remove the oil drain plug to let engine oil out. Dispose of these fluids properly; never pour them down a drain.
4. Remove Engine Covers And Accessories
Take off the engine cover, air intake assembly, and any plastic shields. These parts often block access to the cylinder head.
5. Remove Intake And Exhaust Manifolds
Unbolt the intake manifold and set it aside. Do the same with the exhaust manifold. Some engines require you to remove fuel lines or disconnect sensors. Use a marker or tape to label all hoses, wires, and connectors for easier reassembly.
6. Detach Timing Components
Depending on your engine, you may need to remove the timing belt, timing chain, or camshaft gears. First, rotate the engine to top dead center (TDC) on cylinder one. Mark the positions of timing gears and chains. This step prevents timing issues during reassembly.
7. Remove Valve Cover
Unbolt and lift off the valve cover. This exposes the top of the cylinder head and valvetrain. Set aside bolts and keep them in order.
8. Remove The Cylinder Head Bolts
Check your service manual for the correct order to loosen the head bolts. Usually, you start from the outside and work toward the center. Loosen each bolt a little at a time to prevent warping the head. Remove all bolts and keep them organized.
9. Lift Off The Cylinder Head
Carefully lift the cylinder head from the engine block. The head can be heavy; ask for help if needed. Never force it off with metal tools that could scratch the surfaces. If it’s stuck, gently tap with a rubber mallet or use a plastic pry tool.
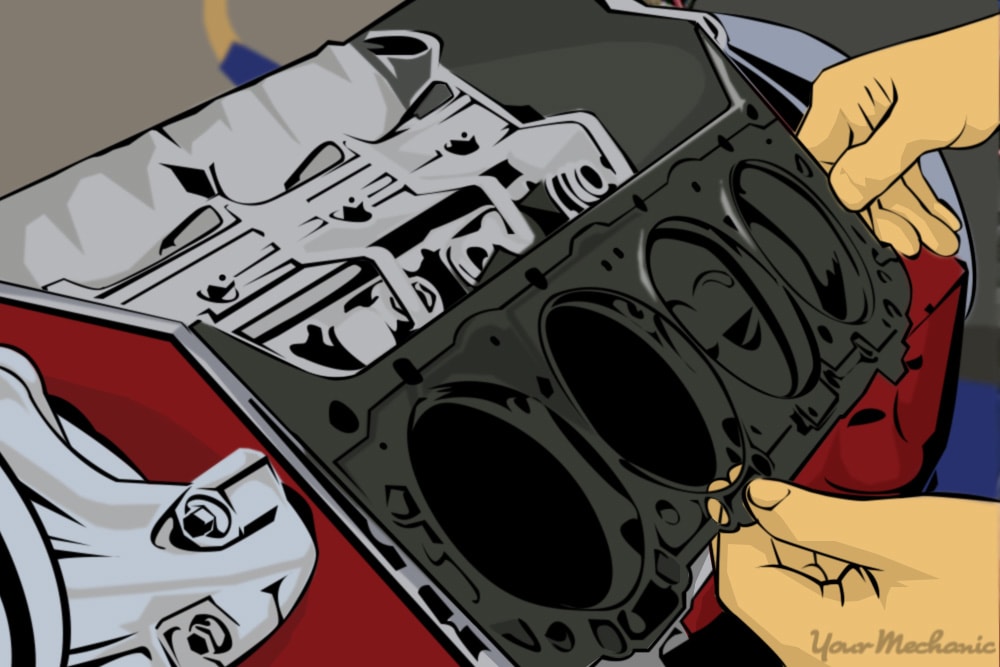
10. Remove The Old Head Gasket
Once the head is off, you’ll see the old gasket on the block surface. Peel it away gently. Use a plastic scraper to remove stuck gasket material. Avoid metal scrapers, which can gouge the block. Clean both the engine block and cylinder head surfaces until all residue is gone.
Pro tip: Use a vacuum or compressed air to blow away debris. Do not let any gasket pieces fall into the cylinders or coolant passages.
11. Inspect For Damage
With the gasket removed, check both the cylinder head and engine block for cracks, warping, or corrosion. If you see any damage, stop and consult a machine shop or professional mechanic before continuing.
10 Best Engine Oil 2026: Don’t Buy a Single Quart Until You See These
Common Mistakes And How To Avoid Them
Many people make errors that can ruin the repair or even destroy the engine. Here are mistakes to watch for:
- Skipping the service manual – Each engine has a unique bolt sequence and torque setting. Guessing can cause leaks or cracks.
- Using metal scrapers – Metal tools can scratch the block, leading to future leaks.
- Not labeling parts – Many hoses and connectors look similar. Label everything during disassembly.
- Dropping debris into engine – Gasket bits in oil or coolant passages can cause major problems.
- Ignoring head or block warping – If you reinstall without checking for warping, the new gasket may fail quickly.
- Reusing old head bolts – Many engines use stretch bolts that must be replaced. Check your manual.
- Improper torqueing – Failing to use a torque wrench can lead to uneven pressure and gasket failure.

Credit: www.youtube.com
Comparing Head Gasket Materials
Not all head gaskets are the same. Here’s a comparison of common types:
| Type | Material | Strengths | Weaknesses |
|---|---|---|---|
| Composite | Graphite or asbestos (older) | Good seal, cheap | Less durable, can fail under high heat |
| MLS (Multi-layer Steel) | Multiple layers of steel with rubber coating | Very strong, handles high power | Requires very flat surfaces |
| Copper | Pure copper sheet | Excellent seal, reusable | Expensive, needs special prep |
Non-obvious insight: Many beginners think any head gasket will do. However, always match the gasket type to your engine’s needs and surface condition. MLS gaskets are best for performance, but require precision.
Safety Considerations
Working on an engine exposes you to chemicals, sharp edges, and heavy parts. Here’s how to stay safe:
- Wear gloves to protect against oil and cuts.
- Use safety glasses when scraping, spraying cleaners, or using compressed air.
- Support the hood and engine parts so nothing falls.
- Always let the engine cool before starting. Hot coolant or metal can cause burns.
- Work in a well-ventilated area, especially when using solvents or cleaners.
- Properly dispose of used oil, coolant, and gasket material according to local laws.
Cleaning The Cylinder Head And Block
After removing the old gasket, cleaning is critical for a good seal with the new gasket.
- Use a plastic scraper or gasket remover tool to gently clean both surfaces.
- Wipe with clean shop rags and solvent (like brake cleaner).
- Check for pitting, scratches, or warping. Place a straight edge across the surface and use feeler gauges to check for flatness (your service manual gives specs).
- If the surface is not flat, the head may need to be machined by a professional shop.
Non-obvious insight: Even tiny pieces of old gasket can prevent a proper seal. Take your time during this step.
When To Replace Head Bolts
Many engines use torque-to-yield head bolts. These stretch when tightened and cannot be reused. Consult your manual; if new bolts are recommended, always use them. Reusing old bolts may lead to uneven clamping force and early gasket failure.
How Long Does Head Gasket Removal Take?
The job takes anywhere from 3 to 10 hours for most home mechanics, depending on engine type, experience, and tool availability.
- Simple 4-cylinder engines (like Honda Civic, Toyota Corolla): 3-5 hours
- V6 or V8 engines: 5-8 hours
- Turbocharged or DOHC engines: 6-10 hours
You’ll save time if you have a helper, label all parts, and stay organized.
Cost Of Removing A Head Gasket
Doing it yourself saves money, but there are still costs:
| Item | Estimated Cost (USD) |
|---|---|
| Head Gasket Set | $30 – $150 |
| New Head Bolts | $20 – $60 |
| Coolant & Oil | $30 – $70 |
| Machine Shop Services (if needed) | $50 – $200 |
| Tools (if buying new) | $100 – $300 |
| Professional Mechanic Labor | $600 – $1,500+ |
If you do the work yourself, you pay mainly for parts and shop services. If you pay a mechanic, labor is the biggest cost.
Credit: www.yourmechanic.com
Practical Tips For A Smoother Job
- Take photos as you disassemble parts. These will help during reassembly.
- Place bolts and small parts in labeled containers or bags.
- Keep the work area tidy—lost bolts slow you down.
- Double-check all hoses and wires are disconnected before lifting the head.
- Read through your service manual before starting, not just as you go.
- If the head is heavy, ask a friend for help or use a hoist.
- Never rush gasket cleaning; even a small mistake can cause a leak.
Examples: Head Gasket Removal On Popular Engines
Honda Civic (4-cylinder)
- Remove air intake, disconnect fuel lines, and unbolt exhaust manifold.
- Remove timing belt cover and belt.
- Remove valve cover, then loosen head bolts in the proper order.
- Lift head and remove gasket.
Ford F-150 (v8)
- Disconnect battery and drain fluids.
- Remove air intake, throttle body, and exhaust manifolds.
- Remove timing chain and camshaft gears.
- Remove valve cover and head bolts.
- Lift cylinder head and remove gasket.
Each engine may have unique steps. Always refer to the service manual for your model.
What To Do After Removing The Head Gasket
After removal and cleaning, inspect everything:
- Check for cracks, warping, or corrosion.
- If all is good, prepare to install the new gasket.
- Replace head bolts if required.
- Follow the manual for tightening sequence and torque specs.
- Replace fluids and check for leaks after reassembly.
If you are unsure about any step, ask for help or consult a professional. Mistakes can be very costly.
How To Know If You Should Attempt This Job
Removing a head gasket is a big task. You should attempt it if:
- You have basic mechanical skills and tools.
- You can follow detailed instructions.
- You have access to a good service manual.
- You have enough time—do not rush.
If you lack experience, consider watching tutorial videos or practicing on a less valuable engine first.
Environmental Responsibility
Old engine oil, coolant, and gasket materials are hazardous. Always take used fluids to a recycling center. Never throw old gaskets or bolts into regular trash if your area restricts them. Check local disposal rules.
For more info on recycling auto parts, see the US EPA recycling guide.
Frequently Asked Questions
How Do I Know My Head Gasket Needs To Be Replaced?
Common signs include white exhaust smoke, overheating, milky oil, bubbling in the coolant, or engine misfire. A chemical test of the coolant can also reveal leaks.
Can I Reuse The Old Head Gasket?
No. Once removed, a head gasket cannot be reused. It compresses and forms a seal; removing it destroys its sealing ability. Always use a new gasket.
Do I Need To Machine The Cylinder Head After Removing The Gasket?
Not always, but it’s wise to check for warping with a straight edge. If the head is warped or pitted, machining is required for a proper seal.
Can I Remove The Head Gasket Without Special Tools?
Basic hand tools are enough for most jobs, but a torque wrench and plastic scraper are essential. For some engines, you may need special tools for timing components.
Is Removing A Head Gasket Worth It, Or Should I Buy Another Engine?
If the rest of your engine is in good shape, replacing the gasket is usually cheaper. But if the engine is badly damaged (cracked block, multiple failures), replacing or rebuilding the engine may be better.
Removing a head gasket from an engine block is a serious but doable job for careful DIYers. If you follow the steps, use the right tools, and take your time, you can save money and learn valuable skills. If you ever feel unsure, seek expert advice before continuing.